Client onboarding best practices center on three priorities: speed, clarity, and personalization. The fastest way to reduce churn in the first 90 days is to give new clients a single, organized space with everything they need — contacts, timelines, resources, and next steps — so they feel confident from day one.
A structured onboarding process does more than prevent churn. It sets the tone for the entire relationship. Clients who experience a disorganized, reactive onboarding are more likely to question the value of what they purchased — regardless of how good the product actually is. The reverse is equally true: a smooth, professional onboarding builds confidence before a client has received their first deliverable.
This guide focuses on the practices and mistakes that separate onboarding that builds confidence from onboarding that quietly causes churn — and how to build an onboarding hub that clients actually use. For the step-by-step process itself, see our client onboarding strategy guide; for a copy-paste checklist, see the client onboarding checklist.
Ready to go digital?
Discover how Zoomforth can help you.
Join 500+ enterprise sales, marketing and HR teams building trackable microsites — no developer needed.
Rated 4.5/5 on G2 · Trusted by Fortune 500 teams
What client onboarding is (and what it isn’t)
For a foundational definition, see our guide on what is client onboarding — including what it includes and why it matters.
The short version: client onboarding is the structured process that runs from contract signature to the client’s first meaningful success. It covers everything that happens between “we signed” and “this is working for us.”
What client onboarding is not:
- A one-time kickoff call followed by a welcome email
- A passive handoff from sales to customer success
- A process that ends when the client has access to the product
Effective onboarding is an active, structured program that meets clients where they are, helps them reach value quickly, and prepares them for long-term success.
Why the first 90 days determine whether a client renews
Research consistently shows that clients who experience time-to-value quickly — meaning they see a meaningful outcome from the product within the first 30 to 60 days — renew at dramatically higher rates than those who don’t. The inverse is equally well-documented: clients who struggle through onboarding are far more likely to churn before the first renewal, even if the product would have worked for them with more support.
This makes the onboarding process one of the highest-leverage activities in customer success. A one-time investment in building a structured, repeatable onboarding experience pays dividends across every client relationship that follows.
The three most common causes of early churn during onboarding:
- Information overload — sending too much at once, with no clear sequence or priority
- Access friction — delayed credentials, unclear setup instructions, or broken links
- Unclear next steps — clients don’t know what to do, so they do nothing
All three are solvable with a well-structured onboarding process.
The six-step client onboarding process
Step 1: Send a pre-kickoff welcome package
Before the first meeting, send a structured welcome package that covers:
- A personal welcome message from the account manager and a named customer success contact
- A one-page overview of what the onboarding process will look like and how long it takes
- A brief intake form asking about the client’s goals, current tools, and key stakeholders
Sending this before the kickoff call does two things: it signals professionalism immediately after the contract is signed, and it lets the first call be a conversation rather than an information dump.
Step 2: Run a structured kickoff call
The kickoff call is not a product training. It is a relationship-setting conversation. Cover:
- Introductions across both teams (with roles and contact information)
- Mutual agreement on goals for the first 30, 60, and 90 days
- Communication cadence (weekly calls, check-in emails, escalation paths)
- Immediate next steps, with named owners and due dates
Send a written summary of the call within 24 hours. Clients who receive a written summary retain more from kickoff calls and arrive at the next touchpoint better prepared.
Step 3: Provide structured access and setup support
Access friction is one of the most common early churn drivers, and it is entirely preventable. Deliver:
- Login credentials and setup instructions in a single, organized document
- A recorded walkthrough video (five to ten minutes) that clients can reference at any time
- A named contact for setup questions — not a generic support inbox
Where possible, offer a hands-on setup session rather than self-serve documentation. Clients who complete setup with assistance from the vendor are more likely to reach first value faster.
Step 4: Establish a 30/60/90-day milestone plan
Write down what success looks like at 30, 60, and 90 days — with specific, measurable milestones. Share this document with the client at kickoff and review it at each milestone call.
Example structure:
- Day 30: Setup complete, first use case configured, team members trained
- Day 60: First deliverable produced, initial results measured, any configuration gaps resolved
- Day 90: Renewal-ready — client has experienced clear value and can articulate ROI to their leadership team
Without specific milestones, “how is onboarding going?” is impossible to answer honestly on either side.
Step 5: Run milestone check-ins and collect feedback
At each milestone (30, 60, 90 days), run a structured check-in call. Agenda:
- Review progress against the milestone plan
- Identify anything blocking the client’s success
- Collect qualitative feedback on the onboarding experience itself
- Confirm next steps and upcoming milestones
Early feedback — collected at 30 days, not 90 — gives you the information you need to course-correct before a client decision about renewal is made.
Step 6: Transition to ongoing success management
Onboarding ends when the client has reached their first meaningful success and has a clear path to the next one. At this point, transition formally from “onboarding mode” to “ongoing success mode” — with a clear handoff document, updated success plan, and renewed contact cadence.
Client onboarding checklist
Use this checklist to ensure nothing falls through the cracks on each new client:
Before kickoff:
- Welcome package sent within 24 hours of contract signature
- Intake form completed by client
- Kickoff call scheduled with all relevant stakeholders
- Internal briefing shared with customer success team from sales
At kickoff:
- Goals and milestones agreed and documented
- Communication cadence confirmed
- All client-side contacts and decision-makers identified
- Next steps confirmed with named owners and due dates
During onboarding (weeks 1–4):
- Access credentials delivered
- Setup completed (with support session if needed)
- First use case configured
- Team training delivered
- 30-day check-in scheduled
At 30 days:
- Milestone review completed
- Feedback collected
- Blockers identified and addressed
- 60-day milestone confirmed
At 60 days:
- Second milestone review completed
- Early results measured and shared with client
- Renewal conversation started if appropriate
At 90 days:
- Formal onboarding completion acknowledged
- Transition to ongoing success management documented
- Renewal timeline confirmed
Client onboarding mistakes that increase churn
Sending everything at once. A 40-page onboarding guide delivered at kickoff guarantees it will not be read. Sequence information in the order clients need it, not the order it is easiest to compile.
No named owner. Every onboarding touchpoint should have a named person responsible. “Our team” is not a contact.
Delaying access. Every day between contract signature and product access is a day the client is questioning their purchase. Deliver credentials as fast as possible — ideally within 24 hours of contract signature.
Measuring activity instead of outcomes. Tracking “number of onboarding calls” or “emails sent” measures your effort, not the client’s progress. Track time-to-first-value instead.
Skipping the written summary. Verbal agreements at kickoff calls are forgotten within 48 hours. Always follow up in writing.
Treating onboarding as optional. Some clients will say they don’t need hand-holding. The ones who decline structured onboarding are often the ones who churn earliest. Make onboarding a default, not a request.
How to build a client onboarding hub with Zoomforth
The most effective way to eliminate information scatter during onboarding is to give each client a single, organized digital hub that contains everything they need — in the order they need it.
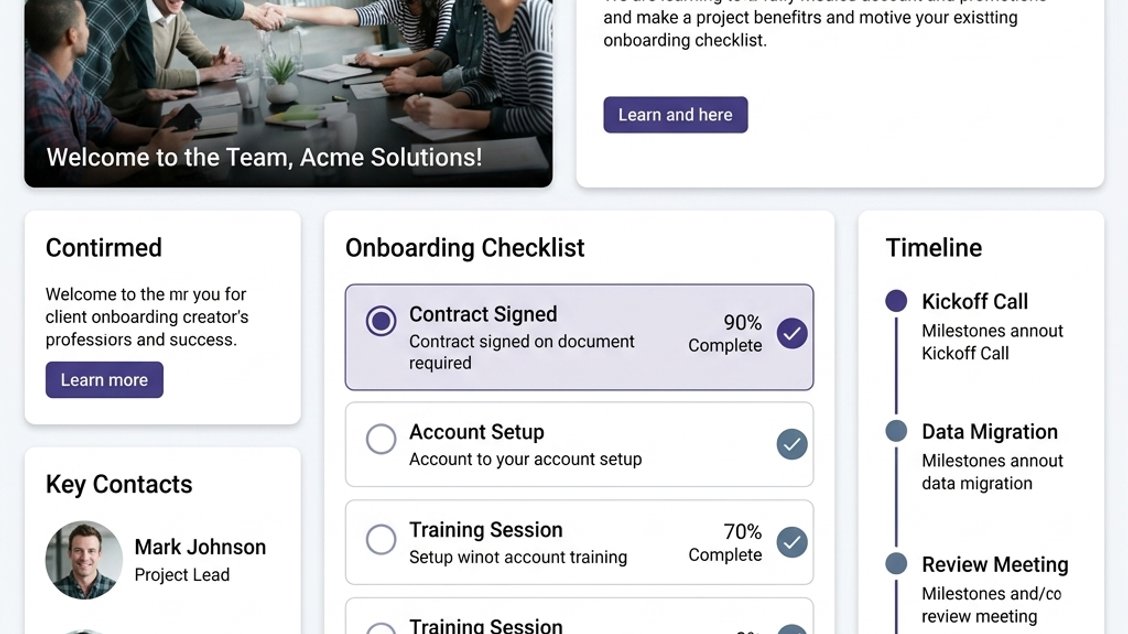
A Zoomforth onboarding microsite can include:
- A personalized welcome message from the account team
- A structured timeline showing the onboarding phases
- Setup instructions, organized by team role (admin, end user, executive)
- Training videos accessible on demand
- Key contacts with photos and direct communication links
- The 30/60/90-day milestone plan
- A FAQ section updated in real time as questions arise
Because the hub is a live microsite rather than a PDF or email attachment, you can update it throughout the onboarding period without resending anything. Clients always see the most current version at the same link.
Customer success teams also gain engagement analytics: which sections clients are visiting, which training resources are being used, and which stakeholders are active in the hub. This intelligence surfaces the signals of a client at risk — disengagement, limited access activity, or failure to complete specific steps — before it becomes a churn event.
See examples of client onboarding microsites in the Zoomforth inspiration gallery.
Ready to build a client onboarding experience that reduces churn? Request a demo and we will show you how leading customer success teams use Zoomforth to onboard clients at scale.
Frequently asked questions about client onboarding best practices
What are the best practices for client onboarding? Client onboarding best practices include sending a welcome package before the first meeting, assigning a dedicated point of contact, setting clear milestones for the first 30, 60, and 90 days, collecting early feedback, and centralizing all resources in a single digital hub that clients can access on demand.
What should a client onboarding checklist include? A client onboarding checklist should include signed contracts, a completed intake form, a kickoff meeting scheduled, access credentials shared, a project management tool configured, a communication cadence agreed, and a 30-day check-in on the calendar.
How long should client onboarding take? Client onboarding typically takes two to eight weeks depending on the complexity of the service. Enterprise accounts may require a 90-day structured onboarding program with multiple stakeholder touchpoints and milestone reviews.
Frequently asked questions
What are the best practices for client onboarding?
Client onboarding best practices include sending a welcome package before the first meeting, assigning a dedicated point of contact, setting clear milestones for the first 30, 60, and 90 days, collecting early feedback, and centralizing all resources in a single digital hub that clients can access on demand.
What should a client onboarding checklist include?
A client onboarding checklist should include signed contracts, a completed intake form, a kickoff meeting scheduled, access credentials shared, a project management tool configured, a communication cadence agreed, and a 30-day check-in on the calendar.
How long should client onboarding take?
Client onboarding typically takes two to eight weeks depending on the complexity of the service. Enterprise accounts may require a 90-day structured onboarding program with multiple stakeholder touchpoints and milestone reviews.